














When a hunting electric bike breaks down, the bike itself is often not the biggest problem. The rider may already be several miles from the trailhead, deep on a forest road, wooded trail, or remote hunting property. Cell service may be unreliable, there may be no repair shop nearby, and the bike may be carrying hunting gear, bags, rack-mounted cargo, or other heavy equipment. As daylight fades and temperatures drop, even a minor mechanical issue can quickly become a serious problem for the return trip.
In this situation, the goal is not to perform a complete repair in the field. The rider needs to answer three more practical questions: Is the bike safe? Can the problem be handled on the trail? If it cannot be fixed, should the rider pedal back, walk the bike, or call for help?
A sensible e-bike troubleshooting process follows four basic steps: turn off the power and make sure everyone is safe, determine whether the problem is electrical or mechanical, address only problems that can be clearly identified, and then choose the safest way back based on the condition of the bike and the route.
Safety Notice: This guide is for general information only; follow your owner’s manual and avoid repairs involving the battery, motor, controller, or internal wiring unless performed by a qualified technician.
What Should You Do First When an E-Bike Breaks Down?
If the bike suddenly loses power, stops providing assistance, makes an unusual noise, or becomes difficult to control, do not repeatedly restart it or continue forcing it forward with the throttle. Turn off the power and move the bike to a flat, stable location where it will not block other riders or vehicles.
If the bike is carrying firearms, bows, harvested game, or other heavy equipment, remove these items from the bike and secure them according to applicable safety practices before inspecting the bike. This reduces the risk of the bike tipping over and takes pressure off the wheels, racks, and kickstand.
Next, check the battery, frame, fork, wheels, and brakes for obvious signs of danger. Do not turn the bike back on, charge it, or open the battery casing if the battery is swollen, leaking, smoking, unusually hot, or giving off a burned smell. The bike should also remain out of service if the frame is cracked, the fork is visibly bent, an axle cannot be secured, a wheel is severely wobbling, or the brakes have completely failed.
These problems are beyond the limits of a safe trailside repair. Continuing to use the bike could result in loss of control, structural failure, wiring damage, or a serious battery-related incident.
Once there are no obvious immediate hazards, use the bike’s symptoms to decide what to inspect next.

Use the Symptoms to Choose the Right Inspection Order
|
What the Bike Is Doing |
What to Check First |
|
The display and lights are completely off |
Battery installation, battery power switch, and external power connections |
|
The display is on, but the motor provides no power |
Assist setting, brake cutoff sensors, other sensors, and motor cable |
|
The bike repeatedly loses power while riding |
Battery connection, remaining charge, system temperature, and wiring |
|
The motor makes noise, but the bike does not move |
Motor type, chain, cassette or freewheel, and wheel |
|
A wheel is difficult to turn |
Brake rotor, tire, axle, and bearings |
|
The bike wobbles from side to side |
Tire pressure, wheel security, rim, and spokes |
|
The drivetrain skips or makes noise while pedaling |
Chain, cassette, chainring, and rear derailleur |
This first assessment does not require taking the bike apart. Narrowing the problem down by its symptoms helps prevent a mechanical issue from being mistaken for a failed motor and reduces unnecessary disconnection of electrical components.
What Should You Check If the Display Is Completely Off?
If the bike will not power on, first make sure the battery is fully seated. Roots, potholes, rocks, and repeated impacts on hunting routes can cause the battery to lose contact even when it has not visibly come loose.
Turn the bike off, remove the battery, and reinstall it. Confirm that it is fully seated in the mount and that the lock and key position are correct. If the battery has a separate power switch, make sure both the battery and handlebar display are turned on.
Next, inspect the plugs and wiring that are visible on the outside of the frame. Look for loose connectors, mud or water around the connection points, pressure from cargo, or cables that may have been pulled by branches. In the field, only reconnect or secure an external connector when the issue is clear. Do not open the controller, motor, battery casing, or any sealed wiring connection.
If the shutdown happened after a long climb, slow riding under a heavy load, or extended use of a high assist level, the motor or controller may have entered thermal protection mode. Turn the bike off and allow it to cool in a shaded location.
After checking the battery, connectors, and system temperature, complete one full power cycle according to the owner’s manual. If the bike still will not turn on, do not continue restarting it repeatedly.
What If the Display Works but the Motor Does Not?
A working display does not necessarily mean the motor has failed. The issue may come from the assist setting, a brake cutoff sensor, a speed sensor, a pedal-assist sensor, or an external cable.
First, make sure the pedal-assist level is not set to zero. Then squeeze and release both brake levers to confirm that they return completely to their normal position. Many e-bikes immediately stop motor output when a brake signal is detected. If mud, a branch, or an impact prevents a lever from returning fully, the system may continue to read it as an active brake.
If the bike uses an external speed sensor, check whether the sensor and wheel magnet have moved out of alignment. Not every bike uses a visible external magnet. Some hub-motor models receive speed information from inside the motor, so the exact inspection point should be confirmed in the owner’s manual.
Also inspect the motor cable near the axle. A cable that has shifted slightly but remains undamaged may be secured again. Do not continue using the motor if the cable jacket is torn, a connector has separated, copper wire is exposed, or there are signs of burning.
After completing the external checks, restart the system once according to the manufacturer’s instructions. If the motor still does not respond but the wheels, brakes, frame, chain, tires, and steering are all in safe working condition, the bike may be pedaled back with the electrical system turned off.

If the Motor Makes Noise but the Bike Does Not Move, Identify the Motor Type
This symptom cannot be diagnosed the same way on every e-bike because mid-drive and hub motors deliver power differently.
A mid-drive motor transfers power through the chainring, chain, and rear cassette or freewheel. If the motor can be heard running but the bike does not move, inspect the chain for a drop or break, check whether the rear freewheel is spinning without engaging, look for damage to the chainring, and make sure the rear derailleur has not moved into the spokes.
A hub motor drives the wheel directly. On a hub-motor bike with an independent throttle, the motor may still be able to move the bike even if the chain has fallen off. If a hub motor makes noise but the wheel does not turn, the problem is more likely to involve the motor cable, controller, axle, or an internal motor component.
Do not keep applying throttle or open the motor casing. Internal hub-motor problems are generally not suitable for trailside repair.
Can You Keep Riding After a Flat Tire?
Stop immediately if the tire begins losing pressure quickly. Continuing to ride can turn a repairable puncture into a torn tube, an unseated tire, a damaged rim, or an axle problem.
Before making a repair, inspect the tire and locate the thorn, nail, metal fragment, or sharp rock that caused the puncture. Make sure the object has been removed. A small hole in a standard inner tube can often be patched, while a torn tube, damaged valve stem, or multiple punctures usually call for a correctly sized replacement tube.
If the bike uses a tubeless tire system, use a plug and sealing method designed for that tire. Tubeless repair tools cannot replace a patch or tube on a standard inner-tube setup.
Removing a hub-motor wheel is usually more complicated. Before taking it off, record the direction and order of the axle nuts, anti-rotation washers, standard washers, and torque arm. Never allow the weight of the wheel to hang from the motor cable. If the installation order is unclear or the correct tools are unavailable, do not force the wheel off.
Repair or replace the tube first, reinflate the tire, and check that it holds pressure. Low-speed riding should only be considered when the tire continues to maintain safe pressure, the bead is correctly seated, the sidewall and rim are undamaged, and the return route is short and relatively smooth. Stop frequently to recheck the tire.
Do not continue riding if the tire is completely flat, continues to lose pressure, has a torn sidewall, has come off the rim, or allows the rim to contact the ground.

How Should You Handle a Dropped, Jammed, or Broken Chain?
If the chain falls off, turn off the bike before placing it back on the chainring and rear cassette or freewheel. Slowly rotate the cranks by hand and make sure the chain moves smoothly across the teeth before turning assistance back on.
If the chain becomes wedged between the rear gears and the frame, do not use the throttle or motor power to pull it free. The motor’s torque may drag the chain farther into the derailleur, spokes, or frame and cause additional damage.
If the chain breaks, a chain tool can be used to remove the damaged link before reconnecting the chain with a compatible quick link. The quick link must match the speed and width of the chain. After the temporary repair, keep motor assistance off and rotate the cranks by hand to make sure the connection is secure.
Stop pedaling immediately if the rear derailleur is bent toward the wheel, has entered the spokes, or prevents the wheel from turning. Continuing to ride could damage the spokes, rim, cassette, and derailleur hanger.
Chains on mid-drive e-bikes often carry higher motor loads. After a temporary repair, avoid high assist, steep climbs, and hard acceleration under heavy cargo. Use a lower assist level whenever possible on the return trip.
When Does a Brake Problem Mean You Must Stop Riding?
If the brakes make a light rubbing sound, first inspect the rotor area for mud, leaves, or small stones. If the debris can be removed, the wheel spins freely, both brakes still provide consistent stopping power, and the rotor is not continuing to heat up, a slow return on smooth terrain may be possible.
Do not continue riding if a brake lever suddenly feels soft, pulls all the way to the handlebar without slowing the bike effectively, or there is visible hydraulic fluid leakage. A hydraulic brake system usually cannot be bled reliably on the trail, and a long descent or heavily loaded bike is not the place to test a questionable brake.
If a wheel moves noticeably from side to side, inspect the axle, rim, and spokes. A hub-motor axle also has to resist the reaction force produced by the motor, so it should not simply be tightened by feel.
A slow return should only be considered when the anti-rotation washers, torque arm, axle hardware, and surrounding parts are intact and can be secured in the correct order with the proper tools. If the tightness, washer orientation, or torque-arm condition cannot be confirmed, stop riding.
If only one of the two brakes still works, do not assume that the remaining brake provides enough protection. A hunting e-bike is usually heavier than a standard bicycle, and carrying cargo can increase its stopping distance even further.
How Does Heavy Hunting Cargo Affect the Decision?
A hunting e-bike may carry a gun rack, bow equipment, rack bags, a trailer, or other heavy gear. A bike that can barely move when lightly loaded may not be safe once the full load is added again.
Heavy cargo increases the load placed on the tires, axles, brakes, chain, and battery. It also increases stopping distance. After a breakdown, remove anything that is not essential and move heavy items away from areas where they could rub against a wheel, brake rotor, chain, or motor cable.
If the bike must be walked, have other members of the group carry part of the hunting gear and luggage whenever possible. One person should not be expected to control a disabled bike while also carrying the entire load.
Before leaving the bike to look for help, save the bike’s GPS location, the trailhead or vehicle location, and the planned return route.
Cold mornings, shorter daylight during hunting season, and unreliable service in remote areas can also affect the decision to continue. Do not wait until the battery is nearly empty or darkness has fallen before responding to a problem that appeared earlier in the ride.
If You Cannot Fix It, Should You Ride, Walk, or Call for Help?
If only the display or motor assistance has failed, but the brakes, wheels, frame, chain, steering, and tires remain safe, turn off the electrical system and test whether the bike can be pedaled.
Because hunting e-bikes are often heavy and use wide tires with more rolling resistance, remove unnecessary cargo, shift into an easier mechanical gear, and test the bike over a short distance on level ground.
If the bike can move but is too difficult to ride safely, walk it instead. Steep grades, mud, snow, and soft sand can make pushing a heavy e-bike extremely demanding, so consider the remaining distance, daylight, weather, temperature, and the rider’s physical condition.
Do not attempt to ride back with failed brakes, a loose axle, a cracked frame, an unseated tire, or an abnormal battery. Do not tow a disabled bike at high speed with another e-bike. A tow strap can become caught in the wheel, chain, or brake rotor and cause both riders to lose control.
If the route is long, the weather is deteriorating, daylight is fading, or the rider is becoming exhausted, contacting a partner, property manager, or rescue service is safer than continuing with an uncertain repair.

What Tools Should You Actually Carry?
A practical electric bike repair kit does not need to contain an entire workshop. It should cover the problems a rider can realistically address in the field.
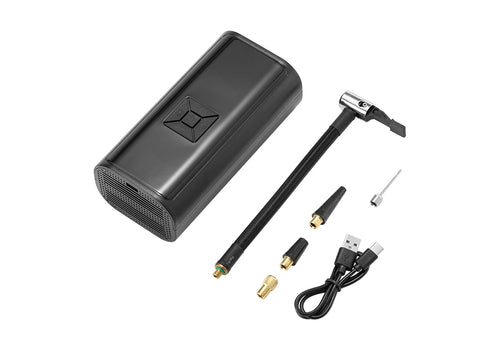
Hex keys and a bicycle multi-tool can tighten a loose handlebar, rack, or accessory. Tire levers, a compact pump, a tire-pressure gauge, patches, and a correctly sized spare tube cover common tire problems. A chain tool and compatible quick link can be used for a broken chain. A wrench that fits the axle nuts can help inspect or secure a wheel.
Hub-motor owners should confirm that their tools can remove the axle nuts and should understand the location of the anti-rotation washers and torque arm. Mid-drive owners should carry a quick link that matches the chain and inspect chain wear before leaving.
Zip ties and waterproof tape can temporarily secure an external cable that is not damaged, but they should never be used to repair burned, exposed, or shorted wiring. A dry cloth can remove mud and moisture from around connectors, but a wet connector should not be reconnected until it has dried completely.
In addition to repair tools, hunters should carry a headlamp, portable power bank, first-aid kit, offline map, drinking water, warm clothing, emergency whistle, and a reliable communication device. After a breakdown, the ability to wait safely or return on foot may be more important than fully repairing the bike.
Use the pump, axle wrench, tire levers, and chain tool at home before the trip. A tool being packed in the bag does not guarantee that it fits the bike or that the rider knows how to use it.
How Can You Reduce the Risk of a Breakdown Before the Trip?
Before leaving, make sure the battery is fully charged and securely locked into place. Test the display, pedal assistance, throttle, and lights. Check that external wiring is not being pinched by a rack, strap, or gun mount, and confirm that all connectors are dry.
Tire pressure should be adjusted for the tire specifications, cargo weight, and route. Pressure that is too low increases the risk of pinch flats, an unseated tire, and rim damage. Pressure that is too high may reduce traction on loose surfaces. Inspect the tread, sidewalls, valve stems, axles, and spokes as well.
Both brakes should provide consistent stopping power independently, and the levers should not pull all the way to the handlebar. Keep the chain clean and properly lubricated, and test the shifting system under a light load before the trip.
Heavy equipment should be positioned low and close to the center of the bike, then secured with reliable straps. Keep gun cases, backpack straps, trailer attachments, and other loose items away from the wheels, chain, brake rotors, and motor cable.
Do not plan a route using only the maximum advertised range. Cold weather, climbing, soft ground, low tire pressure, heavy cargo, high assist, and frequent starts can all reduce real-world range. Before entering a remote area, download an offline map, save the vehicle or trailhead location, and tell a partner or family member where you are going and when you expect to return.
Always reserve enough battery for the return trip. Do not use nearly all of the available charge on the way into the hunting area, because cold temperatures, added cargo, and route changes may increase energy use on the way back.
What Kind of E-Bike Is Better for Long Hunting Routes?
Repair tools can help with punctures, broken chains, and loose parts, but the bike’s suitability for remote terrain also affects how difficult a breakdown may become. Riders traveling over gravel, mud, and rolling forest roads should consider practical range, tire traction, braking, suspension, and cargo capacity rather than focusing only on maximum speed.
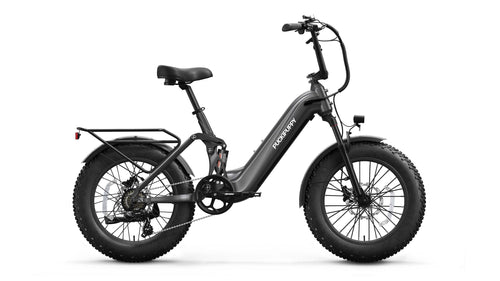
The PUCKIPUPPY Bulldog Pro, for example, uses two 48V 15Ah batteries and has a stated range of 80 to 130 miles. The dual-battery setup gives riders more flexibility when planning longer routes, dealing with an uncertain return distance, or carrying additional outdoor equipment.
It is powered by a 750W rated, 1.350W peak hub motor and uses both torque and cadence sensing. The torque sensor adjusts assistance according to pedaling force, which can provide more controlled power when speeds need to change frequently across gravel roads, forest trails, and rolling terrain.
The bike weighs approximately 94.1 pounds, which is also important to consider before entering a remote area. If motor assistance fails completely, pushing a fully loaded bike over a long distance can be difficult. Even with a long-range, dual-battery model, riders should still inspect the battery, tires, brakes, axles, and drivetrain before leaving, carry tools that fit the bike, and preserve enough battery for the trip back.
Bulldog Pro Ebike
Preparation Matters More Than a Complicated Trailside Repair
When an e-bike breaks down during a hunting trip, the priority is not to complete a complicated repair in the field. It is to decide whether the bike is safe, handle only clearly identifiable problems, and make a timely choice between riding, walking, or seeking help.
Checking the battery, tires, brakes, and drivetrain before the trip, carrying tools that match the bike, and reserving enough battery for the return journey are often more valuable than attempting an uncertain repair far from the trailhead.
🦌Choosing an e-bike suited to rough terrain, long-distance riding, and equipment transport can also provide greater confidence when traveling into remote hunting areas.